


Okay, so first of all, I have to say, that I get all my cute fabric from Kimberly over at
Poppy Seed Fabrics.
Poppy Seed Fabrics.
LOVE her stuff :)
So this is where my fat quarters all came from. 10 for $20. Can't beat THAT! :)
So this is where my fat quarters all came from. 10 for $20. Can't beat THAT! :)
I've been wanting to incorporate some more grey into out entryway, and I thought that a cute polka dot pillow for our little black entryway bench would be JUST the touch I was looking for!

Enter in, my cute fat quarters from Miss Kimberly :)
Enter in, my cute fat quarters from Miss Kimberly :)
I knew I wanted to do some kind of embelishment on my fat quarter pillow, so that's where I started.
*6 strips of white fabric (thickness depends on how large/full you want your flower)
*A fat quarter of your choice
*Poly-Fil
*Sewing Machine

First I took 2 pieces of the white strips, and sewed them together... Leaving one side open.

Like so. (the other end isn't sewed shut)

Then I flipped the whole piece inside out.

So it ended up looking like this!

Then I ran the entire strip through my sewing machine. Pushing and pleating up the material as I fed the strip through.

It will turn out like this!
(oh the possibilities, at this point! You could just leave your ruffle like this, and do some cute ruffle embelishements on the pillow if you want!)

Then I took the strip and started rolling it around itself...

I pinched the bottom, so that I could hold the flower together, and also to make it less full at the bottom and more full at the top.

Till it looked like this!
SEW easy! :)

With my largest flower, I didn't even bother sewing the ends of one side. I just folded a large piece of white fabric over, and sewed through the middle... since nobody sees the bottom anyway.

After you have your flower wrapped just how you want it... take a needle and thread and run it through the layers a couple times, to cinch it together, to keep it from falling apart.

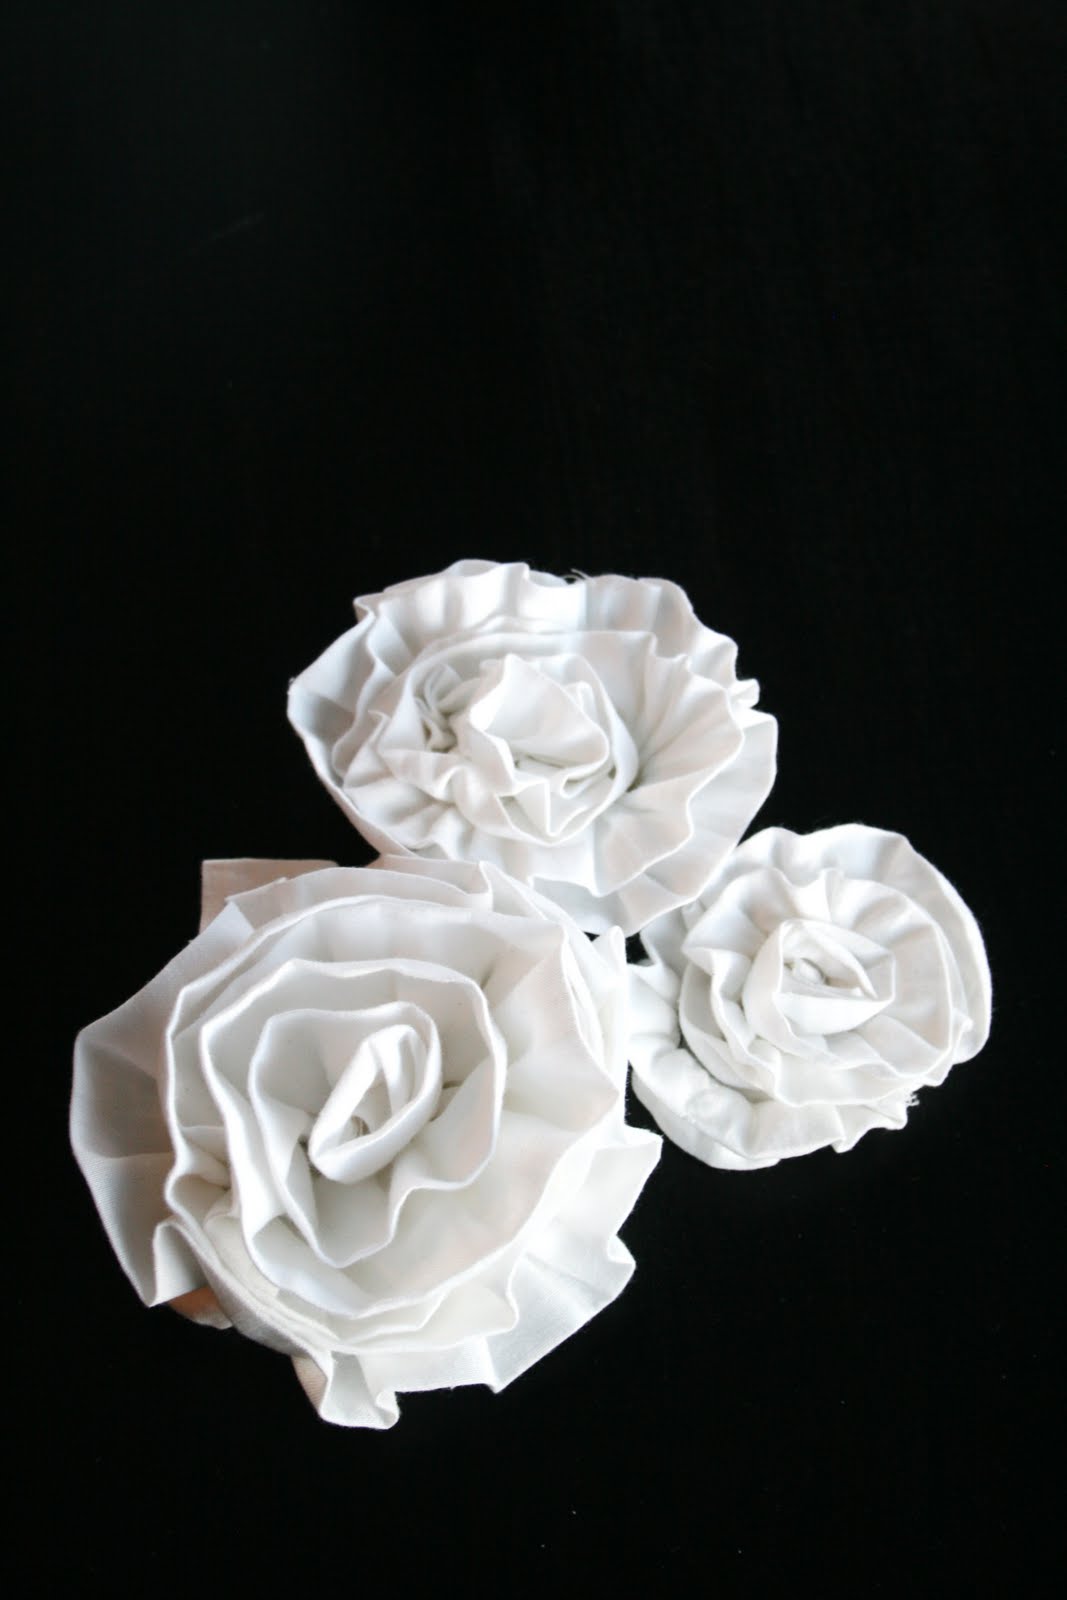
I did three flowers, in three different sizes for my pillow.
After you're done they will look like this!
Next I took my fat quarter, just folded it in half, and then sewed all three sides.
Leaving one end open.


Then, I placed my flowers where I wanted them on the pillow... and again, took a needle and thread, and attached the flowers to the pillow, with a couple of stitches.

Lastly, I took the poly-fil and stuffed the pillow form, till it was nice and full!

Stitch up the open end... and...
TA-DA! You're done!
A super cute pillow for only a few bucks! :)

I think this size is great for a bed, or a small sitting chair as well!
I didn't just stop there with my fat quarters though...
I also turned an ugly thrift store frame into some fun table decor!


So, I have lots of Fat Quarters-think I can make a pillow out of ALL of mine! Ha ha-I crack myself up! If you ever want to make a pillow for me, I will so let you!!
ReplyDeleteCause, I am so nice and thoughtful!
ps-Studio 5 this morning!
Ok, I think you're hogging all the creativity over there, and you need to spread some around!!! I have no sewing skills, it took me literally TWO HOURS just to thread my bobbin on my sewing machine! But I love this pillow enough to give it a try!!! "sew" cute!
ReplyDeleteOkay, Mrs. Smith... my dilemma is always the finishing of the open end of the pillow. How did you sew it up? By hand? By machine? By another mode? :0) Any help you can give would be appreciated.
ReplyDeleteSincerely,
Scared of Pillows Annie
so darling! love that pillow on that bench. LOVE that cute white crate bucket with the "S" and other darling stuff too. Have a super day! Jenn
ReplyDeleteThat is soooo cute! I practiced the fabric flower the other day, and I must say that although it isn't hard a little practice is needed. At least for me. HaHa You are so crafty and come up with way cute stuff. Thanks for sharing.
ReplyDeleteLove the flowers for the pillows, I am a little obsessed suddenly with all the different ways/ kinds of flowers to make. Thanks for adding to that obsession. :-)
ReplyDeletelifeofperks.blogspot.com
I completely agree with Scared of Pillows Annie....Can you show how you closed up the final end?? KT
ReplyDeleteI'm doing the same thing over here today! Will post tomorrow and link back to your tutorial, 'cause why would I do a tutorial when you did it perfectly!?! k?
ReplyDeleteI happened to just order some vintage fabric from etsy & it is on it's way. I wanted to make a pillow...this tutorial came just in time! I too would like to know how you finished off the open end. I never know what to do at this point. Thanks!!
ReplyDeletegorgeous, gorgeous, gorgeous!!! thank you so much for the tutorial! i am going to make one this weekend hopefully!!
ReplyDeleteTrés pretty!!! :) Love those polka dots, and the flowers are lovely. I still haven't figured out how to sew those ruffles without jamming my machine, but one of these days.... ;)
ReplyDeleteSuper cute! Love the color of the polka dot fabric.
ReplyDeleteOK, so I made a pillow last night! Thanks for the tutorial! Here is my take on it:
ReplyDeletehttp://simplyjenna.blogspot.com/2010/07/favorite-pillow-yet.html
Super cute!
ReplyDeleteOh how cute is that?! If I could only sew
ReplyDeleteThis is super cute! I know I've always finished the open end of the pillow by: when sewing the pillow up, you typically sew three sides of the pillow and then 3/4 of the way around the fourth side, leaving enough room to flip the pillow around the right way, and stuff the stuffing in. Then you can machine stitch the rest of the side easily using your zipper foor for the sewing maching. If you choose to hand sew it, you don't have as far to go.
ReplyDeleteI love it. And thanks for the tip on where you get your fabric. I have some Paypal money to spend and I'm going to go check them out. :) Good luck on the CSI Project. :)
ReplyDeleteI love this pillow. I actually made this. Thanks for the great idea.
ReplyDeletethis is awesome!!! I really want to try this:) I love your blog - you're decor is so cute and inspiring! Thanks for sharing with us:)
ReplyDeleteGreat twist on the flowers thanks for sharing!
ReplyDeleteVery adorable! I love this because fat quarters are so inexpensive! My readers would love this since they are into crafts and frugal living! Best combo of both!
ReplyDeleteI came over from the CSI Project.
Oh that pillow is my new favourite thing! I don't know what I love more, the polka dots or the flowers.
ReplyDeleteThank you for the tutorial I just may have to try my own one of these days.
:)
Sarah
Love the pillow tutorial! Sooo cute!
ReplyDeleteI love it! The flowers are perfect.
ReplyDeleteI made this! I made this! If you want to check it out you can go here...
ReplyDeletehttp://thecraftycopycat.blogspot.com/2010/08/whats-black-and-white-and-red-all-over.html
Thanks for the tutorial!!!
I made it and gave it to my mum and she LOVED IT!
ReplyDeleteI blogged about my
FQ pillow
Thank you for the tutorial
This pillow is precious and thank you so much for the tutorial. I just love your blog!
ReplyDeleteHi! I first want to say that I LOVE your blog~seriously it's my "go-to" blog for when I want to escape for 10 minutes :) Now, my question...I got a fat quarter from Poppyseed fabrics from Etsy, thinking it was the same exact fabric that you used above and the dots are little!! Do you remember the name of the fabric you used above? The fabric I got is Dumb Dot Charcoal-Michael Miller. Thanks!
ReplyDeleteWell I made this pillow today and I must tell you it was my first time EVER sewing anything!!!!!! It came out so cute! I used a flower from another tutorial I found on pintrest but I love love love the finished product!
ReplyDeleteFound you on pinterest and this pillow is adorable, now I have a reason to get even more fat quarters and the flowers just finish it off perfectly. Thanks for sharing the tutorial :)
ReplyDelete