{The First Big Reveal!}
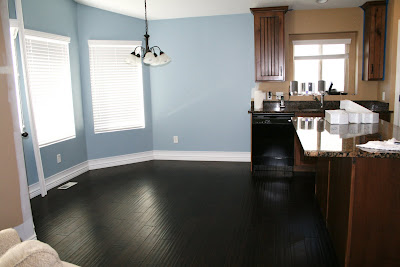
Yup, here it is! The kitchen nook, reveal!
Keep in mind that it's lacking a lot of home decor, but to be honest... I'm SO not at that place in my life yet. LOL. I have an entire garage full of unpacking still. lol.
Here is the proof!
(please do NOT enlarge this photo!)
K, so here are a couple of before's...

And here is the process...
PRIME IT

PAINT IT
We used an AWESOME grey blue called Dockside, by Sherwin Williams.
Normally I wouldn't spend the extra money, on such expensive paint, but SERIOUSLY it was the perfect shade I was looking for... So I just did it.


Ta-Da!
So... Notice the baseboards and the windows. I've always wanted to do something great with them... so off to that project!. lol

We are kind of a mess when we paint...

{AMAZING Cheap Faux Baseboard Tutorial!}
First... become BEST friends with one of these.
Until this project, I hadn't really had much experience... but now... I'm a champ!
(yes... that means that the backfire in this baby doesn't completely scare me anymore... lol)

When we were at my parents house a couple weeks back, and I told my Dad we wanted to bulk up the baseboards, by putting an extra piece of trim in, and painting in between, he gave us this piece of wood, to be our guide! Great idea! This baby has been a LIFESAVER!

Ya, it looks kind of funny, when the board is just up... but watch the process!!!

Nail gun it up, with a few nails, using your scrap piece of wood guide...

Have your hubby figure out all the angles for bay window baseboard...
(this is a LOT harder then it sounds)

More Nailing.....


Some MORE of the Spackle, to hide the huge gap, for when you measured wrong for your hubby to cut... oops

Some Primer....

2 coats of Semi Gloss White.........

And TA-DA!!!!!!
Chunkier baseboards!!!!!! Isn't that SO GREAT!
I think so! Seriously, the molding for just this nook only cost like $6 bucks! Do you LOVE that!?! It seriously changes your entire room! We are continuing this throughout the family room and hallway.

See this piece of molding... Yes... it was expensive, but well worth it, because these poor kitchen windows needed some attention.
Sorry I have no tutorial for this.


Because my awesome Dad and hubby figured it ALL out.
Oh, Aubrielle helped too. lol.

Drum Roll Please!!!!!!!
.
.
.
.
.
Ta-Da!
There it is!
The windows, the baseboard, the blue, the table.....
(please let's take a moment and soak it all in.... yes.... even the light fixture hung up higher by a bunjee cord, and the clunky metal trash can....) LOL.
It's so .... fresh, and clean, and beeeeaautiful!
Ya...The blue in this pictures looks SUPER blue... and is really NOT that blue, but I had to bump up the lighting, during editing my pics, because it's such a hard place to get a true picture!
I love it... and I'm so happy that WE did it!

See! So exciting to show everyone these things!
I can't wait to show you more!
And I have LOTS more!
Oh my gosh... Cason and I decided tonight what we're going to do in the girls' bathroom, and I seriously CAN'T WAIT! It's gonna be SO cool, I hope. It's kind of a risk, but I'm SO excited to see how our plan turns out!!!!!
Check back soon!
PS. we got that AWESOME rug at IKEA, for like $90 bucks! Can you believe it!? I was looking EVERYWHERE for this style of rug. They had one at Pottery Barn, but it was like $550 for that size! Every time someone see's the new look, for the first time, almost always they say...
"OH my gosh, it looks so much bigger in here, is that a different table? What makes it look so big in here now!?"
...ya, maybe the paint, but really I think it's the larger rug. :)


I LOVE, LOVE, LOVE the paint color!!! I would of spent extra too for that beautiful paint. It looks fabulous, I want it! Can I move in next week or will you just come and do it to my kitchen too;) I never got to write how glad I am you guys moved back. I would love to come visit you guys and see the house when it is all done! Keep up the awesome work ( or I should say great tips for me lol).
ReplyDeleteHey Shelley, Congratulations to you and your husband for having the patience, enthusiasm and energy to make your house look so wonderful. I love the blue and the table and the rug and all of it!
ReplyDeleteWell Done!
E
It LOOKS GREAT!!!!! I love the baseboard idea...might have to steal that one!! :)
ReplyDeleteIt looks GREAT! Wow - I love that molding!
ReplyDeleteXOXO
Jen
It looks great! I love this baseboard idea too! We did this same idea on crown modling in our first house... Which I am posting about on Thrusday so come check it out! Thanks for the Link!
ReplyDeleteOh my gosh! I LOVE the color. It was worth the extra money because it is the perfect shade. I might just have to try out dockside in my house! :) The room looks great!
ReplyDeleteI knew they used that trick with up top molding, but never even thought to do it to baseboards! They look GREAT, and your room is fantastic! Thanks for sharing!
ReplyDeleteGreat idea for the molding! I love the blue too!
ReplyDeletewhat a wonderful paint shade! you were right to go with your gut. excellent work!
ReplyDeleteannie @ livingwithannie
http://livingwithannie.blogspot.com
What a great idea on the moulding and I loooove the paint color!
ReplyDeleteok! i am sooooo excited! i wanted to do the same with a fake chunky baseboard but some people are skeptical! it looks great! does it look great in person? and we have the same three plain windows that i wanted to do the same thing too! thanks so much for sharing and now i am raring to go!
ReplyDeleteI love the fresh new look! Especially the fake me out tall base! Clever.
ReplyDeleteI'm in LOVE! You picked a BEAUTIFUL color... totally worth the $$! What an amazing idea to bulk up the baseboard... I want to do it too!
ReplyDeleteWow! Your "new" kitchen is fabulous !! I love your choice of paint and am super impressed with the molding !! I want to do the same to my windows, but, alas, know that it wouldn't turn out too well. We'll see. I'm sure you're throughly enjoying your new space. Beautiful !! Stop by sometime, Becca (Adventures in Decorating)
ReplyDeleteI absolutely love it! Paint color, base boards, floor color, table, rug and all. I am making a note of the base board idea for the future. I just love before and afters.
ReplyDeleteThat is gorgeous!! You did a great job! I love how you did the base boards! Way to go!
ReplyDeleteI love everything! That baseboard tip is awesome! Thanks for sharing.
ReplyDeleteThe floor is beautiful too!
gail
love the blue!!!!my fav color!!!
ReplyDeleteOH MY GOSH !! I have wanted to chunk up my baseboards too. I can't tell you how much I appreciate this tute ! :-)
ReplyDeleteLove it !
you are just too SMART !
lisa
Love it all! I too am looking for a rug that color, but can't tell on Ikea's website one thing from the other. Do you remember the name of your rug?
ReplyDeletekatiechase21@gmail.com
I LOVE the base board!!!! Can you tell me how big the space is between the actual baseboard and the added trim piece?
ReplyDeleteThanks so much!!! I LOVE the color too!!!
chrisgreedy@hotmail.com
Ditto on your question:). Did you ever find out?
DeleteDitto on your question:). Did you ever find out the distance? I'm wanting to give this a try this week. Exciting:)!
DeleteDid anyone find out the space & Size?
DeleteAppears to be a 2 x 2"
DeleteGreat job! This is an nice clean transformation!
ReplyDeletesuch a smart idea for the baseboard extension! we are so stealing the idea :) thanks for sharing!
ReplyDeleteWow, what a great idea! I was already planning on doing that at the ceiling but now (a) I will use your Dad's trick when I do it and (b) I might try the baseboards too.
ReplyDeleteI just discovered your blog the other day and am systematically working my way through the archives so when you start seeing lots of comments pop up on old posts you'll know why :)
I have 3 kids close together too...my first had just turned 2 when my twins were born (boy and then twin girls)
I LOVE this! We are planning on doing something similar in our guest room, but for crown mouldings. Add some material on the actual ceiling... Thanks for the great work!!
ReplyDeleteHi. I came across your blog through Centsational girl's. I love your decorating style...so fresh, light, and airy. Love the new kitchen. Can I ask you where you got your breakfast table and chairs. I am looking to replace mine. Thanks, Smitha
ReplyDeletelove that! This is my first visit to your blog (except for the peek at the pantry which is how I found you!) and I am starting from the beginning. lol. Awesome design style. Thank you so much for sharing. Becki
ReplyDeleteYou know last night I was looking at blue paint chips and I'm not a big blue person. That is EXACTLY what I'm wanting. That blue with the dark wood. I love it!!!!!!!
ReplyDeleteawesome changes - fantastic tutorial - love it all.
ReplyDeletethanks for sharing.
mrs. c. xox
Beautiful! Love the baseboard tutorial. Great color!
ReplyDeleteLoving your blog! My husband and I have one as well. Would love for you to check it out and let us know your thoughts. Keep the great posts coming!
ReplyDeletehttp://mplusbdiaries.blogspot.com/
Just found your site through pinterest. Love the tips and the baseboard idea is so great! New follower:)
ReplyDeleteLove the final ... and especially love the faux baseboard tutorial! I pinned it so I can recreate in my home. My molding is sad and wimpy!
ReplyDeleteAbsolutly amazing ... beautifulll
ReplyDeleteran across this idea on pinterest ! Now that it brought be to your blog i have been following you ! i love your blog and your home is coming along so stunning !
ReplyDeleteBaseboards...brilliant!
ReplyDeleteBrilliant!!! I love our big house with enough room for my six kids, and I wouldn't want to move back into the tiny 2 bedroom craftsman bungalow. EXCEPT I miss all the character in that house... the plate rails in the dining room, picture rails in the bedrooms, and fantastic molding everywhere. This seriously gives me so many great ideas for possibilities. Thanks!!!
ReplyDeleteCan I ask where you found your dining set? This is a huge issue for me. I can't find one I like! I like yours!
ReplyDeleteGreat project. One tip: If you use glue on the back of the wood then you can use headless 23 gauge pin nailer. It leaves much smaller holes. I would suggest an Uffy Tools TH-T-CZ10 or TH-T-CZ20.
ReplyDeleteThis is so GREAT! Thanks for inspiring me!
ReplyDeleteI love that baseboard idea wish I knew this before Oh did the little bedroom wicked idea!
ReplyDeleteThanks for sharing!
It's so timely that I stumbled onto your blog, because I bought a house back in November and have been working on it ever since. I LOVE the baseboards. That is just genius and I plan to do that here! Amazing.
ReplyDeleteMy aunt and uncle did this to the crown moulding in their home and it looks amazing! I wish that I could do it with ours but we have those dang textured walls and I don't think it would look right with the rough surfaces. Just started following your blog and it's AMAZEBALLS! I love seeing people's home with similar tastes as mine! Yours is absolutely gorgeous!
ReplyDeleteDied and went to heaven. Thanks!!!
ReplyDeleteOh I am going to try this, I have the most ugly base boards in the world and I've been looking all night for ideas to make them prettier!
ReplyDeleteWe love the way you made the baseboards bigger with paint and a bit of lumber. What a great project! I’ll be adding a link to our Flooring pinboard next week. Check them out at Pinterest.com/Homedepot.
ReplyDeleteBest!
- Chante LaGon for The Home Depot
Love the how to's! Looks great!
ReplyDeletesuper,gonna use your idea,cant wait to get started,thanks
ReplyDeleteHello,
ReplyDeleteI love your blog! I would like to ask how you framed the bay windows?? I have some in my living room and master bedroom and I do not know what to do with them! And this look you did here really 'classes' them up! Please explain.
We are just starting to redo our room...now I cant wait! and you gave me more Ideas lol thanks for sharing
ReplyDeleteWhere did you buy that thinner trim? I can't seem to find it anywhere, though I realize they probably don't sell them at Home Depot. (well, they do, but only very small pieces that cost a ton of $$$$). Any help would be so appreciated. Thaaaanks!
ReplyDeleteLove it! Can you share where you bought the thinner trim? I can't find it anwhere (ok, so I shopped online and at Home Depot). Home Depot sells them in wood color and they cost a small fortune for just 6 ft or so. thaaanks!
ReplyDeleteI really love the look of the paint. Maybe it's just spring but I really think it's the perfect color for that room. Thanks for sharing this!
ReplyDeleteTreasured Spaces
What is the floor made of?
ReplyDeleteWhat is the floor made of? I am looking at doing this to my mud room floor.
ReplyDeletehow would i do this with steel frames. should i be using a nail gun? what do you suggest?
ReplyDeleteWhat is the size of the board your dad gave you to used to measure?
ReplyDelete